Analysis and Repair of Leakage Switch Trip
The principle of leakage switch tripping:
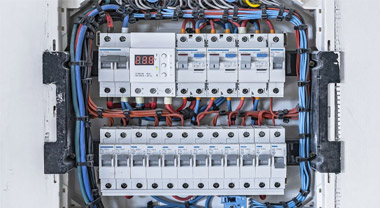
There is a zero-sequence current transformer in the leakage switch. This transformer has a small number of turns on the primary side and a large number of turns on the secondary side. The power line (single-phase is generally live and neutral, and three-phase is three-wire or four-wire, all in parallel Passing through the transformer is equivalent to the primary side of the transformer. Normally, the current flowing in and out of the transformer are equal, and the transformer cannot induce current (according to Kirchhoff’s current theorem, for any closed loop, And the algebraic sum of the current flowing out of the node is 0). When a leakage occurs, a part of the current does not pass through the power line to form a loop. The current flowing in and out is no longer zero. The transformer induces current and is amplified by the secondary side. The electromagnetic mechanism generates a magnetic field to push the mechanism to trip.
Three situations of leakage switch tripping:
- The leakage, and the leakage switch is normally protected;
- The leakage switch is broken.
- The leakage switch is too sensitive.
How to determine the specific cause of the trip?
Step 1: first try to close, if it can be closed, you can do nothing at first, as long as there is no more jumping later, just ignore it. If it jumps again soon, you need a professional to check to see if there is leakage. Generally, it is to measure the insulation resistance between each line and the grounding line (disconnect the neutral line from the switch), as long as the insulation resistance Above 2M ohms, you can rest assured that there is definitely no leakage. You should consider whether there is a problem with the leakage switch. You can use a small screw knife to gently tap the leakage switch. If the leakage switch is unstable, it will jump when you tap it. Knock until it doesn't jump. Of course, it is better to directly replace the leakage switch. If the gate cannot be closed, proceed to the second step.
Step 2: Unplug all the plugs, turn off all the switches and switch on again. If it can be switched on, plug in the unplugged plugs one by one, and turn on the switches that are turned off. They will jump as long as they are plugged in. , The problem is found, and then deal with it according to the situation. If the gate cannot be closed, proceed to step 3.
Step 3: Remove the wire behind the switch and close it again. If it can be closed, it proves that there is no problem with the leakage switch, and there must be leakage, which requires further treatment. If it still doesn't close, needless to say, change the switch. First connect the disconnected line, and proceed to the fourth step: At this time, you can be sure that there is a problem with the line. It is best to ask a professional for help, because the later action will be larger and the fault needs to be restored after troubleshooting. If you cannot close the gate, proceed to the fourth step.
Step 4: First find out if there is a line leading to the outdoors in your home. This is the place that is most likely to cause leakage, especially in rainy and humid seasons. First think of this place. Disconnect this set of lines before closing. , If the gate can be closed, handle this part of the line. If the switch still cannot be closed, disconnect the lines from the kitchen and bathroom again. This is also one of the places that causes the most leakage. There is also a place where high-power electrical appliances are often used. Due to the high current, it is easy to damage the line and cause leakage. Through the inspection of the above several places, most of the faults can be eliminated, and then carefully connect the disconnected wires, check carefully, and confirm the safety before re-powering.
Why does the leakage switch frequently trip?
1. Poor installation. The lead wires of each pile head are not connected firmly and loose for a long time, which will cause the pile hair to heat and oxidize, burn the outer insulation of the wire, and emit sparks and burnt smells. This will cause the line to undervoltage and the air switch to operate.
2. Does not match the load. The actual electrical load of the family is greater than the rated current of the low-voltage circuit breaker on the line. It usually occurs after newly installed or newly added high-power household appliances such as air conditioners and electric water heaters. The matching air switch must be replaced.
3. Leakage or short circuit of electrical appliances or lines. When electrical leakage is found in the electrical appliances used, just unplug the electrical equipment with leakage fault, and then re-close the low-voltage circuit breaker to transmit electricity. If you find a line leakage or short circuit, you must ask an electrician to deal with it. After the low-voltage circuit breaker trips, first disconnect all the shunts, and then close them one by one to send power. When a circuit is closed, the low-voltage circuit breaker cannot be powered on, that is, the branch is faulty, this circuit should be disconnected, and other branches should be closed for power transmission. After the faulty shunt problem is detected, the power can be sent after repairing.
4. The power input line voltage is too high. This is very dangerous and usually occurs in residential buildings powered by a'three-phase four-wire' system. At this time, first check whether the two wires of the line are live; second, check whether the left and right neighbors also trip; third, use a multimeter to measure the incoming line voltage. Never forcibly close the low-voltage circuit breaker, otherwise the electrical appliances will be burnt out, or the fire will be caused.
5. After the above reasons are found and eliminated, if the household leakage switch (the leakage protector is assembled with the low-voltage circuit breaker and has overload and short-circuit protection functions) still cannot be closed and sent, please check the protector's inlet and outlet pile heads If there is no problem with the incoming line voltage, disconnect each group of outgoing lines separately to check whether there is any internal circuit failure. If there is no problem with the outgoing lines of each group, or the power still cannot be sent, replace with a new leakage switch.
Related
Address:No 658,Jinzhong Road,Changning District Shanghai China
Tel:+86-021-33555507 Email:[email protected] |