How to Remove a Circuit Breaker from a Panel Box?
As a senior electrical engineer, I've encountered various electrical issues, and one common task that homeowners and electricians alike face is removing a circuit breaker from a panel box. In this blog post, we'll guide you through the process of safely and efficiently removing a circuit breaker from a panel box. Please note that working with electrical systems can be hazardous, so if you are not comfortable or experienced with electrical work, it is highly recommended to seek assistance from a licensed electrician.
Table of Contents
- Safety Precautions
- Tools and Materials Needed
- Step-by-Step Guide to Removing a Circuit Breaker
- Troubleshooting Common Issues
- Conclusion
Safety Precautions
Before we begin discussing how to remove a circuit breaker from a panel box, it is crucial to understand the importance of safety when working with electricity. Always take the necessary precautions to avoid injury or electrocution.
1. Turn off the power
Locate the main breaker switch in the panel box and turn it off to disconnect the electrical supply. This will ensure that the circuit breakers are not energized during the removal process.
2. Test for voltage
Use a voltage tester or multimeter to confirm that there is no voltage present in the panel box. Be sure to test all the terminals and wires connected to the circuit breaker you are planning to remove.
3. Use insulated tools
Always use insulated tools when working with electricity. This will help to protect you from accidental contact with live wires or energized components.
4. Wear appropriate protective gear
Wear rubber gloves and safety glasses to minimize the risk of injury when working with electrical equipment.
Tools and Materials Needed
Before you start removing a circuit breaker from a panel box, gather the following tools and materials:
- Insulated screwdriver
- Needle-nose pliers
- Wire stripper
- Voltage tester or multimeter
- Flashlight
- Replacement circuit breaker (if applicable)
- Marker or masking tape (to label wires)
- Protective gloves and safety glasses
Step-by-Step Guide to Removing a Circuit Breaker
Now that we have covered the safety precautions and gathered the necessary tools, it's time to remove the circuit breaker from the panel box. Follow the steps outlined below to ensure a smooth and safe process.
1. Locate the circuit breaker to be removed
First, identify the circuit breaker you need to remove. It should be labeled with the appropriate information, such as its amperage rating and the area of the house it serves. If you're unsure, consult the panel box's circuit directory or the home's electrical blueprint.
2. Turn off the circuit breaker
Flip the switch on the circuit breaker to the "off" position. This will disconnect power to the specific circuit you are working on.
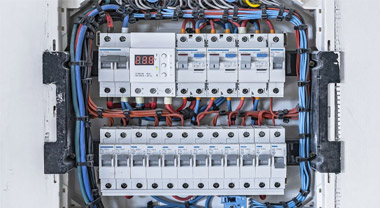
3. Remove the panel box cover
Unscrew and carefully remove the panel box cover. This will expose the circuit breakers and wiring within the panel box. Make sure you have adequate lighting to see the components clearly.
4. Test for voltage
Even though you've turned off the main breaker and the individual circuit breaker, always test for voltage before proceeding. Use your voltage tester or multimeter to confirm that there is no electricity flowing to the circuit breaker you're planning to remove.
5. Disconnect the wire(s) from the circuit breaker
Using your insulated screwdriver, loosen the screw on the circuit breaker terminal that holds the wire(s) in place. Carefully pull the wire(s) out of the terminal. Label the wires with a marker or masking tape to ensure proper reconnection later.
6. Remove the circuit breaker
Firmly grasp the circuit breaker with your hand or needle-nose pliers and gently wiggle it side to side while pulling it away from the panel box. The circuit breaker should pop out of its slot. Be cautious not to damage any adjacent circuit breakers or wiring.
Troubleshooting Common Issues
Occasionally, you may encounter some difficulties while removing a circuit breaker from a panel box. Here are a few common issues and their solutions:
1. Circuit breaker is stuck
If the circuit breaker is difficult to remove, gently wiggle it while applying steady pressure. Avoid using excessive force, as it could damage the panel box or other components.
2. Wire is difficult to remove from the terminal
Ensure that the terminal screw is fully loosened before attempting to remove the wire. If the wire is still stuck, use needle-nose pliers to carefully pull it out. Be cautious not to damage the wire's insulation.
3. Unclear labeling on the panel box
If the labeling on the panel box is unclear or missing, consult the home's electrical blueprint or a licensed electrician to confirm which circuit breaker you need to remove.
Conclusion
Removing a circuit breaker from a panel box is a straightforward task if you follow the proper safety precautions and steps outlined in this guide. Always remember to work safely, use insulated tools, and wear appropriate protective gear when working with electricity. If you encounter any issues or are unsure about any aspect of the process, do not hesitate to consult a licensed electrician for assistance.
Once you have successfully removed the circuit breaker, you can proceed with replacing it or making any necessary repairs to your electrical system. By understanding how to safely and effectively remove a circuit breaker from a panel box, you'll be better equipped to maintain and troubleshoot your home's electrical system.
Keep this guide handy for future reference, and feel free to share it with friends or family members who may also benefit from this information. Remember that safety always comes first, and when in doubt, it's best to consult a professional to ensure the job is done correctly.
Related
Address:No 658,Jinzhong Road,Changning District Shanghai China
Tel:+86-021-33555507 Email:[email protected] |